Use QuickSetDNS to change between DNS configurations in a heartbeat
The DNS system is one of the cornerstones of the Internet. It is used mainly to look up the IP address of a domain name so that the requests reach the right server on the Internet.
Most Internet users are probably using the default DNS service of their Internet Service Provider (ISP). That's not a bad thing most of the time, as it works right out of the box.
There are however a couple of issues that users may identify when they are using the default DNS of their ISP. The following -- incomplete -- list looks at some of the more common issues that you may experience:
- Look-ups may not be as fast as they can be, thus increasing the latency of the connection.
- DNS may be used to block specific websites from being accessed, by either redirecting users away from the original server or by blocking connection attempts outright.
- Your ISPs DNS service may be less reliable, which may result in look-up failures among other things.
Third party DNS providers may fix all those issues for you. In addition, they may offer other features such as phishing or botnet protection, web-based filtering, or typo correction that you can make use of.
QuickSetDNS

Nirsoft's QuickSetDNS is a free portable application for all recent versions of the Microsoft Windows operating system that enables you to switch between the default DNS provider and alternate providers with two clicks.
The program looks up the default DNS service first and adds it to the list of available services, so that you can go back to it whenever the need arises. It furthermore lists the Automatic DNS configuration and Google's Public DNS server.
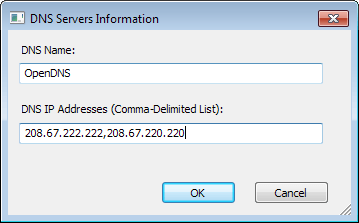
If you want to add other providers, say OpenDNS, you can do so easily:
- Right-click in the main window and select New > DNS Server or use the shortcut Ctrl-N to open the dialog.
- Type a name for the new service (pick any descriptive name you want), and add at least two server IP addresses separated by a comma.
- Click OK to save the new server.
The new server is added to the list of available DNS servers. To switch to it select it before you click on the activate DNS button in the interface. If you prefer the keyboard, use the F2 key to activate the selected DNS server.
Note: You may need to select the correct network adapter first before you do so if your computer has multiple interfaces installed.
There is another option that you can make use of to speed things up. You do not have to open the program manually first whenever you want to switch the DNS provider. It is possible to create a command that does so for you. Just select one of the providers in the program window before you select Edit > Copy SetDNS Command Line or press Ctrl-L.
This copies the command to set the selected DNS server to the clipboard. You can add it to a simple batch file for example to change the server with the click on the file.
Verdict
If you need to change DNS servers regularly on your system, for instance for testing purposes or because you are using different services for different purposes, then you may find QuickSetDNS helpful for that task.
No comments:
Post a Comment