Tuesday, 5 November 2013

Online Job!!!!!!!

How to turn off the Hangout History

How to turn off the Hangout History

Google is hard at work at making hangouts, the company's chat product, more appealing. Hangouts were previously only available on Google+, but they have since then expanded to other products and even replaced some like Google Talk in the process.
Google users can now use hangouts on Google+, Gmail, and mobile devices for example.
When you start a hangout, its messages will automatically be saved to the history, so that you can access them again at a later point in time. This not only includes textual contents, but also pictures as they will be saved automatically as well.
One issue that some users have run into recently is the 1000 photo limit for hangouts. It means that you cannot send anymore photos to people once you reach that limit. You may get the "Message not sent. Touch to retry" error when you have reached that limit.
The limit seems to be per-contact, so that you can still send photos to other users which makes the issue even more puzzling to solve.
Google's recommendation is to either turn of the Hangout History, or to delete photos that have been sent in the past.

Turning off the Hangout History

hangout-history
There are other reasons for turning off the history. Maybe you do not want it to be recorded on your computer for privacy reasons.
Note: The history is hangout specific. If you turn it off for one hangout, it is still turned on for others.
To turn off the hangout history, open the relevant hangout on Google+ and click on the options icon in the interface once it opens up.
Here you need to uncheck Hangout History to disable the feature for that particular hangout.Make sure you click on the save button to apply the change. Here you can also access the archive. Note that a notification is displayed in the chat window when you modify the history setting.
hangouts history off
To turn off the history on Android, tap on the menu button of the device and select Turn history off from the context menu to do so. Here you can also access the archive.
Messages that are exchanged while the history is turned off will only be visible for a short time in the hangout window before they are deleted automatically. The history may still be recorded by other participants of the hangout depending on which client they use.
Side Tip: Saved messages by the feature can be accessed with a click on the chats label on Gmail, or with a search on the Gmail website. This is only available if the History feature is turned on.

How to remove LiveUpdate.exe from your computer

I check all running processes regular on the computer systems that I use to make sure that the system is safe and that nothing slipped by the defenses.
While that works well, I usually spot processes started by third party programs after installation. Most of the time, they are not needed at all and waste only system resources.
I noticed the LiveUpdate.exe process recently on a Windows PC and was not really sure what to make of it at first. I immediately thought of Windows Live, but since I never heard of the executable before, it was almost certain that it had nothing to do with Microsoft's service.
It is thankfully relatively easy to find out more about a process running on your system.

What is LiveUpdate.exe

The first thing that I usually do is open the Windows Task Manager with Ctrl-Shift-Esc, right-click the process in question, and select properties from the context menu.
The location of the service on the system is displayed here, so that I know its folder location and as part of this usually also the program that installed it on my system.
Note: The process LiveUpdate.exe only shows up if you select to "Show processes from all users" in the Task Manager.
task manager live update
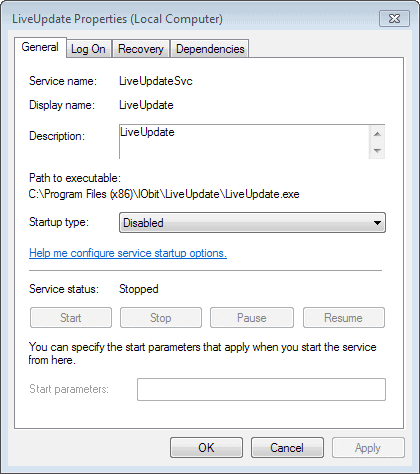
If it is a service, you can get similar information by loading services.msc on your system using the run box or command prompt. The process in this case was a service, and the Services Manager revealed additional information about it.
liveupdate.exe
I knew now that it was created by the software company IObit, likely to power the updating of company products on my system similar to how Firefox or Google Chrome are handling the updating.
Now that I knew that, I started to investigate the matter further. I noticed that I did not have any IObit products installed on my system anymore, which led to the conclusion that LiveUpdate.exe was a leftover that -- for whatever reason -- was not removed during the uninstallation of the last IObit product that made use of it.
Disabling  and removing LiveUpdate.exe
Since there was no IObit program left on the system, it did not really make that much sense to have the updater running in the background at all times.
First thing I did was to change its startup type from automatic to disabled in the Services Manager. I also made sure that the service itself was stopped.
Next thing I did was to delete the service. I have explained how this is done on the linked article. Here is a quick rundown of the commands:
  1. Tap on the Windows-key and type cmd.
  2. Right-click cmd.exe in the results and select Run as Administrator from the context menu.
  3. Type sc delete LiveUpdateSvc and tap on the enter-key.
  4. This removes the service from Windows.
  5. You should receive a [SC] DeleteService SUCCESS message.
I checked that the service was indeed deleted, and proceeded to its directory on the system:C:\Program Files (x86)\IObit\LiveUpdate.
I deleted the full directory, and the IObit directory as well, since no products of said company were installed on the system.
It is very likely that you will find orphaned keys in the Registry that point to Live Update. You can run a search for them if you want, but they should not cause any issues on the system. It is alternatively possible to run a program like CCleaner to find orphaned files in the Registry.

What you need to know about Solid State Hybrid Drives (SSHD)

What you need to know about Solid State Hybrid Drives (SSHD)

Solid State Hybrid Drives (SSHD) are a combination of a Solid State Drive (SSD) and a platter-based drive (HDD). The main idea here is to combine the speed of the SSD technology with the storage space of the HDD, so that you are getting the best of both worlds.
The main question here is obviously when using SSHD drives makes sense, and what you need to take into consideration before you buy a drive for your system.
While SSD prices have dropped significantly in the past, the Gigabyte to Dollar ratio is still everything but good, especially when compared to conventional hard drives.
Samsung's excellent 840 EVO Series with 250 Gigabytes is for instance available for $165.99 currently on Amazon, while Seagate's Barracuda 3 TB HDD for $118.55. If storage would be your only criteria, you would make a much better bargain buying Seagate's drive.
A hybrid drive that combines an 8 Gigabyte SSD with 1 Terabyte of HDD storage on the other hand is available for about $100. While you get less platter-based storage and less Flash memory storage, you get to use them both in a single drive.
Most SSHD solutions on the market combine 64 Gigabyte SSD technology with 512 GB or more HDD storage and 8 GB of Flash Drive cache.

Solid State Hybrid Drives FAQ

solid state hybrid drive
The following FAQ looks at common questions that you may have in regards to hybrid drives. While I can't promise that it will answer all of your questions, it is likely that it addresses main concerns and issues.
If there is something left out, let me know in the comments.
Are SSHDs as silent as SSDs?
Since hybrid drives are a combination of different drive types, that is not the case. While the SSD-part is still as silent as it gets, the platter-based part of the SSHD is however as noisy as other platter-based hard drives.
If you want a silent system, SSHDs are not an option.
What about mobility?
If you drop a laptop with a SSD inside, you can be sure that this won't impact the drive or the data on it (provided that you do not throw it off the Empire State Building). Impacts may however render conventional hard drives unusable as they are not as shock-resistant as SSDs.
The same is true for hybrid drives.
How fast are SSHDs?
Most Solid State Drives are way faster than conventional hard drives. Hybrid Drives on the other hand are not. Depending on the model, you may notice improvements when you are launching applications, booting the system, or performing other read operations.
You will however notice that write operations do not really benefit from the SSD cache, and that data needs to be on the SSD-part of the drive to benefit from faster access times and loading times.
Companies like Seagate have developed algorithms like Adaptive Memory Technology to determine which files benefit the most from being cached on the Solid State Drive.
Since most hybrid drives come with 8 Gigabytes of cache currently, it is fair to say that data will be frequently shifted around and replaced on the drive, and that it is unlikely that you will get all your important data cached by it permanently.
Note: To see improvements in regards to operating system boot times, you need to have booted the OS at least once before that kicks in. So, first boot will be comparable to HDD load times, but consecutive boot times will be between HDD and SSD boot performances.
All in all it is fair to say that you will see improvements over conventional HDDs, but not as much as if you would be using a Solid State Drive.
Generally speaking, if you want the biggest (noticeable) performance increase, the SSD is the way to go. If that is not an option for whatever reason, SSHDs may be an option as they speed up some operations on the system.
What are the benefits of SSHDs?
Besides what has already been mentioned in the article, SSHDs offer other benefits over other single-drive or multi-drive solutions.
One being that they are easier to install. Since you only have to handle one drive, you can't really do a lot of things wrong during installation of it or setup of the operating system. In a multi-drive system, you need to make sure to install the operating system on the correct (faster) drive for example, while there is no such obligation in regards to hybrid drives as they are accessed as single-drives.
Should you buy a SSHD?
There are situations where your computer may benefit from a SSHD. This is a great option if you only have space for one hard drive and need both speed and capacity. So, replacing your notebook's slow 512 GB platter-based hard drive with a 1 TB hybrid drive will be very beneficial to the overall performance of the system. It is also a solid option if you are on a budget.
On desktop PCs, it usually makes more sense to buy a SSD drive and a storage drive that is platter-based provided that you have enough cash for that option. While that is the most expensive option available, it ensures that you get maximum performance and enough storage at the same time.
Depending on how you use your computer, you may find a 64 GB SSD sufficient. I personally would pick at least a 128 GB drive, especially if you are using Windows. You can get Samsung's 840 EVO 120 GB drive for about $100 currently for example, and pay another $100 for a 2 or 3 TB drive.

SuperCache Express uses RAM to boost load and write times of cached data

SuperCache Express uses RAM to boost load and write times of cached data

There is always something that improves the performance of computer systems further. If you use a regular hard drive, you can migrate to a solid state drive (SSD) for faster loading times. And if you already use such a drive, you may use multiple SSD for even faster performance, or use a caching solution like SuperCache Express instead.
Note: SuperCache Express is not a free software. The desktop version costs around $80 currently. A 14 day trial version is available that you can make use of to test it though.
The basic idea behind SuperCache Express is to use the RAM of the system for caching. This works best if your PC has a lot of RAM, 2 Gigabytes is the minimum, with 4 or more GB or RAM recommended.
Depending on which operating system you use, you may use up to 95% of the available system RAM for caching. On 32-bit systems, you are limited to 50% of the available 4 Gigabytes (except for Windows XP where you may use up to 75%) while you do not have that limitation on 64-bit versions.

SuperCache Express Review

Installation
The installation is quick and will install a system driver on the PC. A restart is required afterwards before you can start using the caching solution.
Configuration
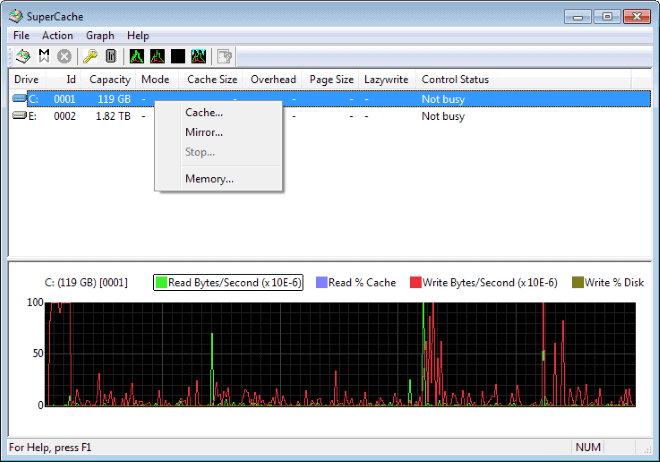
SuperCache is not enabled by default, and you need to activate it on at least one of your drives before you can make use of it. To do so, start the application, right-click on a drive, and select Cache from the context menu.
supercache cache
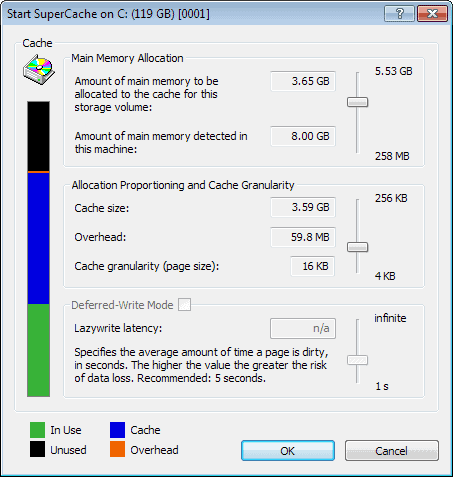
Here you need to click on Start to enable the caching. This opens the configuration screen where you can allocate memory to the cache.
Side note: If this is not the system drive, you can also enable Deferred-Write Mode which helps reduce write bottlenecks on hard drives by deferring writes to the drive.
start supercache
Once you have made your choices here, the cache is automatically used to speed up read operations on the system.
It needs to be noted that this benefits data that is already in the cache the most. If you start Firefox or Google Chrome for the first time after enabling the cache, you may not notice that much of a speed improvement when you compare it to starting the programs without the caching enabled. It may still be noticeable, depending on the speed of the hard drive on the PC system.
When you start the programs for the second time though on the system, you will notice near instant loading times. The same is true for data that you load in programs. And those near-instant loading times are independent from the speed of the hard drive installed on the system.

Benchmarks

How fast you can go? Check out the following benchmarks (using AS SSD Benchmark)
1. Caching not enabled
no caching
2. Caching enabled, first run
caching first run
3. Caching enabled, second run
caching second run

Mirror Mode

SuperCache 5's Mirror Mode feature mirrors an entire partition or volume in RAM, so that the data is available on the drive and in memory. This works obviously only if the PC has enough RAM installed for the feature. This works well with smaller sized Solid State Drives and even smaller disk partitions that you create for that exact purpose.
Considering that you can install up to 192 Gigabyte of RAM on a PC running Windows 7 64-bit, and up to 512 Gigabyte on a 64-bit version of Windows 8, you may be able to mirror a full SSD using the mode.
Note: Depending on which edition you use, you may not make use of that much RAM on the system.
Verdict
SuperCache Express can speed up the loading of cached data significantly on the system, which makes it very interesting for desktop users who run PCs with a lot of RAM that are not rebooted often.
You may especially benefit from it if you have to load data regularly from hard drives and notice that they are a bottleneck that slow you down.
Is it worth the requested $80? For most end users this can probably be answered with a no. If you use applications regularly that benefit from faster loading times, or are a competitive gamer who wants an edge over other players, then you may want to download the trial version of the application to see if it helps you achieve that goal.

Saturday, 2 November 2013

JavaScript Popup Blocker for Chrome takes care of popups on sites like LiveTV

JavaScript Popup Blocker for Chrome takes care of popups on sites like LiveTV

The majority of modern web browsers come with popup blockers that take care of several common types of popups that you may run into on the Internet.
You may encounter sites and services that use different techniques to spawn popup windows in the browser that are not blocked by the default popup blocking mechanics.
One basic example are popups that are launched as soon as you click anywhere on the site.
These popups are usually created using JavaScript and while browser extensions such as NoScriptmay help as they prevent JavaScript from being run by default, they may also limit the site's functionality at the same time.

JavaScript Popup Blocker

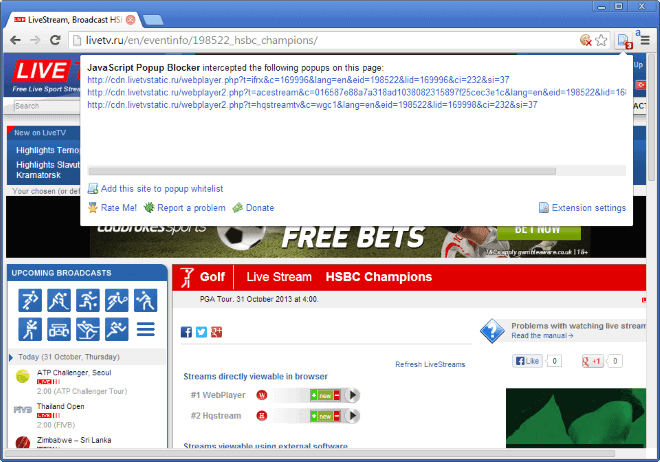
javascript popup blocker
Chrome users can install the JavaScript Popup Blocker extension which adds advanced popup blocking capabilities to the web browser. While there is no guarantee that it will take care of all popups that you may run into on the Internet, it takes care of several annoying forms of popup windows including popups that are spawned when you click on a page element on a website.
The extension displays an icon in Chrome's address bar that highlights the number of popups that it has blocked on the active website.
You can click on that selection to see all those popups, which can come in handy if you need to open one of them. Some websites use popups for certain features, such as downloads, and if you block them, you won't be able to use those functionality.
A site that bombards you with popups is the live streaming website Livetv which not only uses them to launch the player window, but also to spawn a lot of popups regularly while you are watching the stream.
You will notice that the Chrome extension blocks the streaming window popup on the site as well, but that is easily fixed by launching it manually with a click on the extension's icon and the selection of the right blocked popup window from the list.
Popups are not spawned anymore in the player window and while you will still see lots of ads, it is less annoying than having to deal with ads and popups on the site.
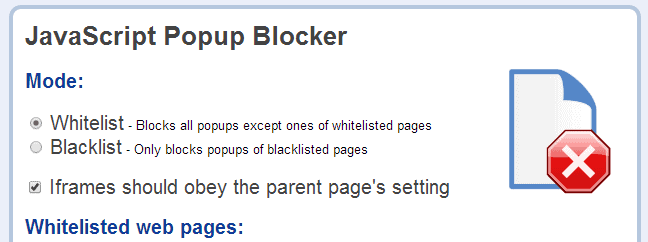
JavaScript Popup Blocker ships with options to whitelist websites, so that popups are allowed on those. You can use wildcards * when you add websites, which may be useful for sites that use popups for part of their functionality.
chrome block popups
If you do not like the "block all" approach of the application, you can alternatively switch to a blacklist only setting. Here only popups that you have added to the blacklist are blocked, while all others are allowed.

Verdict

JavaScript Popup Blocker is a handy extension for the Chrome browser that gives you better control over popups in the browser. The whitelist approach is probably best for the majority of users, as it blocks all popups except on pages that you have explicitly whitelisted in the options.
Since it is possible to open any blocked popup window with a click on the extension's icon, you are not losing any functionality in this regard. And if you run into the same blocked popups regularly, you can easily whitelist them to make things more comfortable for you.

Fan Canvas visualizes a YouTube user’s video history

Fan Canvas visualizes a YouTube user’s video history

If you follow a couple of video producers or people who upload videos on YouTube you may have encountered situation where you want to browse the latest videos released by them, or videos released in a particular time period.
While you can do so with a couple of clicks, the interface that YouTube provides you with is not well suited for that task, as you have to browse from the latest videos all the way down to the videos that you want to see.
That may result in a lot of clicks for you depending on when the videos that you are interested in have been published to the account.
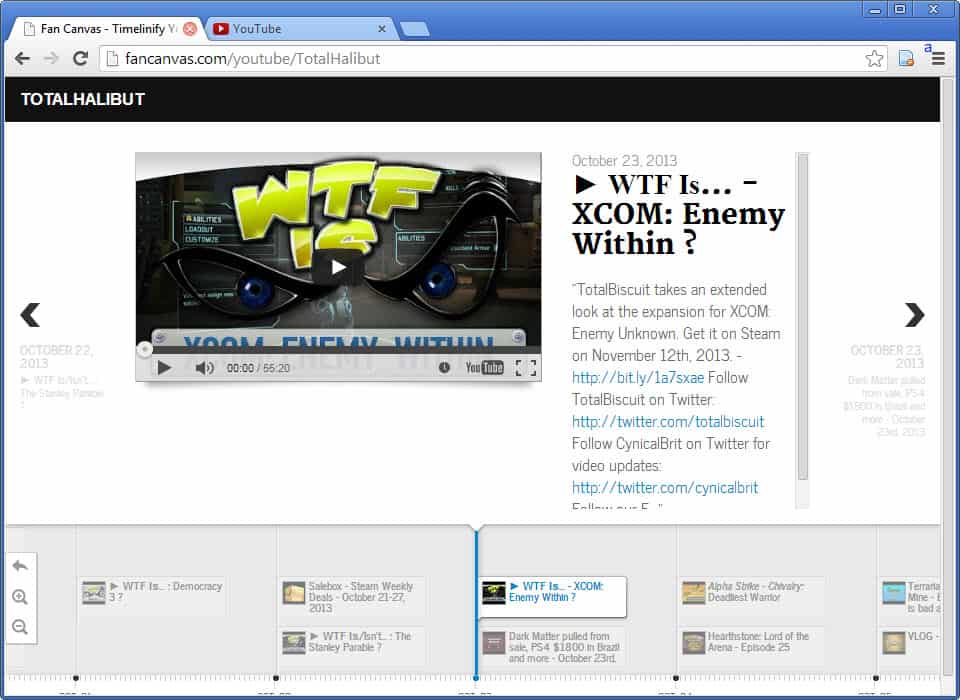
Fan Canvas is a new third party service that lets you browse a YouTube user's video history visually. All you need to do is type or paste the username of the YouTube user in the form on the main page on the website to get a visual representation of all public videos that were uploaded to YouTube by the account.
Note: The service seems to limit the total number of videos that it displays in the timeline to 25. That's a severe limitation that reduces the service's usefulness significantly. There are no configuration options to change that, and it is not clear if the limit will be removed in the future.

Fan Canvas

fan-canvas
The service displays a timeline of videos at the bottom of the browser window, and the actual videos that you have selected on top of it. You can scroll the timeline by holding down the mouse button in the timeline interface and drag motions to the left or right, or by using the back and forward buttons up top.
You can play any selected video right away on the screen, and also read the description that was posted along with it.
Depending on the upload frequency of a user, you may want to compact or extract the timeline. Compacting will increase the time interval that is starting with days, so that you will end up with a monthly view in the end. This can be useful if a user has not uploaded that many videos to the site.
The opposite is true if you select to extract the timeline, as you will have greater control over timelines that display a lot of videos.
There is also a bookmarklet available that you can make use of.

Verdict

The limitation makes Fan Canvas an interesting proof of concept service. It will remain that unless the video limit is removed by its developers.
While it is still good to get a quick overview over the latest videos uploaded to a particular account, it cannot be used currently to browse the complete history of a user on YouTube